Thursday, February 26, 2015
The Co-op.
I recently visited The Merc in Lawrence, KS. It's about a half hour from me on the highway, so I don't go nearly as often as I would like. I generally pick a time when I have a little "fun" money to spend--and spend it, I do!
What's so special about The Merc? Well, for starters, it's a co-op. What does that mean? It means that people in the community buy into the store. Regular people own shares of the market. They have input into which products the store carries, and in which direction the company goes.
Cooperative stores have a long history, dating back centuries. Regular people were looking for ways to survive economically when their stores became too expensive and lacked variety. Communities began to come together and create their own local stores, with more affordable pricing and their choice of products.
One of my favorite sections of The Merc is the cheese counter. As anyone can tell from reading my blog, I love cheese! What makes this cheese counter better than others? Does it have more variety? Is it less expensive? Well, yes and no. There is a wonderful selection there of both locally produced and various artisanal cheeses. It may not have quite the variety of the specialty cheese counter at your local chain supermarket, but you can be assured that it is such an interesting variety that you won't want to shop at the regular grocery store. As for pricing, yes, something cheeses will cost more, but many will cost less, and what's more, the person behind the counter will be able to answer your questions about different varieties. My questions have always been promptly and knowledgeably answered by a friendly staff member, who seems equally excited about the cheese as I am.
Enthusiastic people who have faith in the products they are selling, who believe in the quality of their goods, that is a rare thing, and something of which we need more. It's easy to become blase and desensitized to what we eat and where it comes from. In my experience and opinion, cooperative markets are a great way to get excited again about your food as well as be directly involved in you local economy.
If you'd like to join The Merc, visit their website, linked above, and check out the information on how to become a member.
I'd love to see one in Topeka. How about you? What awesome products would you like to have available in your local market? Comment below and let me know.

Friday, February 20, 2015
Part 2: Who Doesn't Love Bacon
Last time, we left off in the fridge. The pork belly was curing and had a ways to go. Now, what you want to do is, after a week (because my pork belly was only an inch thick), I wanted to see how it was doing. The easiest way to do that is to taste it.
Pull your pork belly out of the fridge, cut off a little piece, rinse it under the faucet and pop it in a pan to cook it. You want to check the level of flavor and how salty it is. If it is not salty or flavorful enough, feel free to leave it in the fridge for two or three more days and try it again. If it is too salty, you can soak the pork for a short time in fresh water. That will help leech out a bit of the salt.
At this point, you have a couple of options. You can cook your bacon in the oven, or you can smoke it. I did both.
One piece, cured with 5-spice, I finished in the oven. I felt the flavors were too delicate and would be overpowered by any smoke.


I set the oven to 225 F, the same temperature I would keep a smoker at if I were smoking the meat. It stays in the oven until it reaches an internal temperature of 150 degrees-- and then it's ready!

Method number two is to smoke the delightful pork belly. Now, I don't own a smoker, so I make one out of things I already have in the house-- a metal baking pan, a bread pan, and a cooling rack.

One side of the pan is for the embers and the smoke, the other side has the bread pan with water in the bottom, to keep the meat moist while it smokes. For the wood, I selected apple wood, and soaked it in a mixture of whiskey and water. The meat sits over the bread pan, away from the heat. All that's left to do at this point is to wait. It generally takes 2-3 hours of smoking to bring the meat to 150 degrees. If you don't want to spend this much time, or if you're like me and kind of suck at making embers, smoke it for an hour or so, and then finish in the oven.

The meat is flavorful, delicious, and provides intense satisfaction, because you made it. It will last for months in the freezer, if wrapped well, and most likely a couple of weeks in the fridge. I'm a little unsure because it never lasts that long! It's a great addition to your favorite meals. If you freeze it first, you can get thin slices, if you prefer. I love to give it as gifts. Homemade bacon is quite impressive and anyone on the receiving end will love you!
Have a favorite cure recipe or question? Feel free to post it below. I'd love to hear from you!
Pull your pork belly out of the fridge, cut off a little piece, rinse it under the faucet and pop it in a pan to cook it. You want to check the level of flavor and how salty it is. If it is not salty or flavorful enough, feel free to leave it in the fridge for two or three more days and try it again. If it is too salty, you can soak the pork for a short time in fresh water. That will help leech out a bit of the salt.
At this point, you have a couple of options. You can cook your bacon in the oven, or you can smoke it. I did both.
One piece, cured with 5-spice, I finished in the oven. I felt the flavors were too delicate and would be overpowered by any smoke.
I set the oven to 225 F, the same temperature I would keep a smoker at if I were smoking the meat. It stays in the oven until it reaches an internal temperature of 150 degrees-- and then it's ready!
Method number two is to smoke the delightful pork belly. Now, I don't own a smoker, so I make one out of things I already have in the house-- a metal baking pan, a bread pan, and a cooling rack.
One side of the pan is for the embers and the smoke, the other side has the bread pan with water in the bottom, to keep the meat moist while it smokes. For the wood, I selected apple wood, and soaked it in a mixture of whiskey and water. The meat sits over the bread pan, away from the heat. All that's left to do at this point is to wait. It generally takes 2-3 hours of smoking to bring the meat to 150 degrees. If you don't want to spend this much time, or if you're like me and kind of suck at making embers, smoke it for an hour or so, and then finish in the oven.
The meat is flavorful, delicious, and provides intense satisfaction, because you made it. It will last for months in the freezer, if wrapped well, and most likely a couple of weeks in the fridge. I'm a little unsure because it never lasts that long! It's a great addition to your favorite meals. If you freeze it first, you can get thin slices, if you prefer. I love to give it as gifts. Homemade bacon is quite impressive and anyone on the receiving end will love you!
Have a favorite cure recipe or question? Feel free to post it below. I'd love to hear from you!
Sunday, February 15, 2015
Part 1: Who Doesn't Love Bacon?
Bacon. That one word has become the epitome of all that is trendy and tasty in the food world, at least in certain circles.
Everyone knows that bacon is pork, but what is the process by which plain old fatty pork is transformed into that miraculous food, that delicious, meaty goodness with the bits of crispy fat that melt in your mouth?
Well, it's not as difficult as you might think. After you've made it for yourself and tasted how wonderful bacon can be, you might not want to buy it from the store ever again!
Let's start at the beginning.
Pigs have been domesticated for thousands of years, both in Central Asia and Europe. They are a great food source, being high in fat, which = energy. Pork also preserves well, and you can make any number of items from one pig: sausages, chops, roasts, and of course, bacon, to name a few.
Salting and curing meats is an ages old method of preservation. Prior to ice boxes and refrigeration, salting and smoking were often the only ways of keeping meat edible for more than a couple of days.
Out of necessity, beauty is born.
So, what is it that helps bacon stay fresh for so long? Salt, yes, but also sodium nitrite. During the 1900s, it was discovered that the addition of sodium nitrite significantly slowed the growth of harmful bacteria, such as botulism, in food. It also is what adds that appealing pink color to ham and bacon. It is also carcinogenic and toxic in large quantities, which is why it is used in such small quantities. A 2lb bag of Morton's Tender Quick contains only 0.5% of sodium nitrite.
On to the fun stuff.
The first step for making bacon is getting a slab of pork belly. I chose to buy some from The Merc out in Lawrence, KS. However, I discovered later that Herman's Meats here in Topeka carries 5lb slabs, pre-measured and frozen. It's up to you how you want to purchase it. At The Merc, you can get different sized pieces, and if you live in Topeka, it's a bit of a drive.
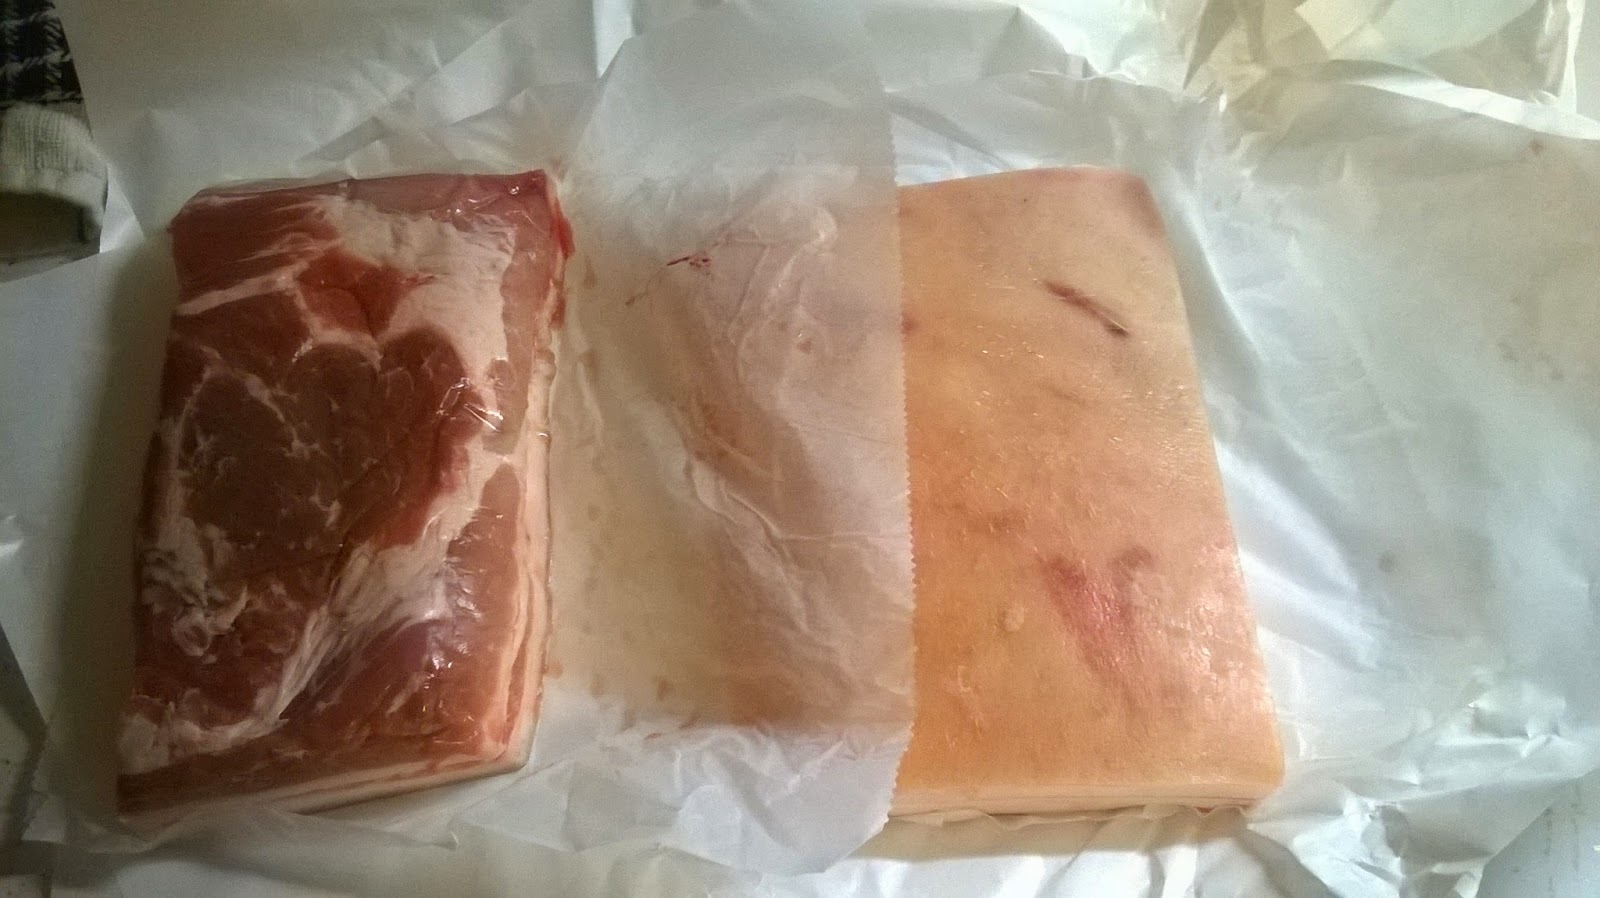
This is the beautiful meat I chose to turn into that most savory and fragrant of anytime-foods. Two pieces means two variations. This time, I chose to use a recipe I've used before for the larger piece and for the smaller, I wanted to see what an Asian inspired cure would be like.

For the first piece, the smaller of the two slabs, I combined, per pound:
1Tbsp Morton's Tender Quick
1Tbsp Brown sugar
Then, I combined separately:
5-spice powder
Ginger, ground
Cayenne
I mixed the above three ingredients until it tasted the way I wanted it to, then added it to the Tender Quick, brown sugar mixture.
Next, I coated the entire slab with molasses for two reasons. One, I love the flavor of molasses and I thought it would go well with the spices, and two, it helps the cure to stick to the meat.


Finally, I packed on the cure, making sure to cover both sides.

I wrapped the meat in several layers of plastic. A gallon sized zip bag works very well, but I didn't have one. Then, I wrapped it back in the butcher paper and put it in the fridge.
The beauty of making bacon at home is you can make any combination of flavors you want. You can be inspired, creative. The sky is the limit.
Next is the hardest part--waiting. The bacon will need to cure for at least 7 days per inch. Let the waiting begin....
Part 2 coming soon!
Everyone knows that bacon is pork, but what is the process by which plain old fatty pork is transformed into that miraculous food, that delicious, meaty goodness with the bits of crispy fat that melt in your mouth?
Well, it's not as difficult as you might think. After you've made it for yourself and tasted how wonderful bacon can be, you might not want to buy it from the store ever again!
Let's start at the beginning.
Pigs have been domesticated for thousands of years, both in Central Asia and Europe. They are a great food source, being high in fat, which = energy. Pork also preserves well, and you can make any number of items from one pig: sausages, chops, roasts, and of course, bacon, to name a few.
Salting and curing meats is an ages old method of preservation. Prior to ice boxes and refrigeration, salting and smoking were often the only ways of keeping meat edible for more than a couple of days.
Out of necessity, beauty is born.
So, what is it that helps bacon stay fresh for so long? Salt, yes, but also sodium nitrite. During the 1900s, it was discovered that the addition of sodium nitrite significantly slowed the growth of harmful bacteria, such as botulism, in food. It also is what adds that appealing pink color to ham and bacon. It is also carcinogenic and toxic in large quantities, which is why it is used in such small quantities. A 2lb bag of Morton's Tender Quick contains only 0.5% of sodium nitrite.
On to the fun stuff.
The first step for making bacon is getting a slab of pork belly. I chose to buy some from The Merc out in Lawrence, KS. However, I discovered later that Herman's Meats here in Topeka carries 5lb slabs, pre-measured and frozen. It's up to you how you want to purchase it. At The Merc, you can get different sized pieces, and if you live in Topeka, it's a bit of a drive.
This is the beautiful meat I chose to turn into that most savory and fragrant of anytime-foods. Two pieces means two variations. This time, I chose to use a recipe I've used before for the larger piece and for the smaller, I wanted to see what an Asian inspired cure would be like.
1Tbsp Morton's Tender Quick
1Tbsp Brown sugar
Then, I combined separately:
5-spice powder
Ginger, ground
Cayenne
I mixed the above three ingredients until it tasted the way I wanted it to, then added it to the Tender Quick, brown sugar mixture.
Next, I coated the entire slab with molasses for two reasons. One, I love the flavor of molasses and I thought it would go well with the spices, and two, it helps the cure to stick to the meat.
Finally, I packed on the cure, making sure to cover both sides.
I wrapped the meat in several layers of plastic. A gallon sized zip bag works very well, but I didn't have one. Then, I wrapped it back in the butcher paper and put it in the fridge.
The beauty of making bacon at home is you can make any combination of flavors you want. You can be inspired, creative. The sky is the limit.
Next is the hardest part--waiting. The bacon will need to cure for at least 7 days per inch. Let the waiting begin....
Part 2 coming soon!
Monday, February 2, 2015
Thoughts on Kraut
Ok, so this is a food that gets a bad rap. Sauerkraut.
I know what most of you are thinking. It smells weird, tastes strange and lots of people have a negative opinion of it. Guess what? Sauerkraut is awesome!
According to the USDA, sauerkraut is a great source of Vitamin C, Vitamin K and dietary fiber. It's a great companion to a lot of other foods. Part of my family is from Poland and the traditional Christmas Eve dinner in our house was pierogi (more on these in another post), kielbasa, piles of sauteed onions, and sauerkraut.
So, here's one of the things I think is most interesting about kraut--it is a natural byproduct of the yeast in the air. Sauerkraut is composed of four ingredients: cabbage, salt, yeast and time. But, you don't have to add the yeast yourself. It...just...happens!
This is how easy it is:
Ingredients:
5lbs cabbage (more or less)
3 Tbsp kosher or pickling salt (I use kosher because I always have it on hand)
1 Large crock or jar or bucket (sterilized)
Clean, sterile towels
You are going to sterilize your container, and finely chop or shred your cabbage.

I've got a great crock here that I borrowed from a friend. This is like the Cadillac of crocks and you are under no obligation to make this investment. However, if you do want one, check out Ebay or Amazon. There are a variety of options, different companies, sizes, colors, etc.
The next step is simply to layer your cabbage with salt. So, layer of cabbage, salt, cabbage, salt, cabbage, until your crock is full. You want the last layer to be salt.

Let this sit at least several hours, but overnight is probably best. The salt is going to work on the cabbage and water will be released, creating a brine. The brine should cover the top of the cabbage when it is weighted down. If it doesn't, you can make some bring using 1tsp of salt per 1cup of boiled water. Make sure it is cooled down, and then add enough brine to cover your cabbage.
As you can see, the cabbage changes drastically, just in a matter of hours. After letting it sit overnight, there was not enough self-generated brine to cover the cabbage, so I made some and covered the cabbage. The next step is to weigh down the cabbage. The crock came with the weights, but if you are using another container, a great method is to put a plate on top of the cabbage and fill a gallon jug or jar with water and place it on top.

Finally, cover the crock. This one comes with a water seal. The deep lid and the lip provide a reservoir for water that creates a natural barrier. If you are using a non-crock method, you will use a damp, sterile towel or pillow case to cover your bucket or container.

Now, all you have to do is leave it alone. You should check it once a week for 3-4 weeks, until the cabbage reaches the level of fermentation you want, and skim off any stuff that grows on top.
I'll be updating everyone on the kraut as time goes one. Stay tuned!
I know what most of you are thinking. It smells weird, tastes strange and lots of people have a negative opinion of it. Guess what? Sauerkraut is awesome!
According to the USDA, sauerkraut is a great source of Vitamin C, Vitamin K and dietary fiber. It's a great companion to a lot of other foods. Part of my family is from Poland and the traditional Christmas Eve dinner in our house was pierogi (more on these in another post), kielbasa, piles of sauteed onions, and sauerkraut.
So, here's one of the things I think is most interesting about kraut--it is a natural byproduct of the yeast in the air. Sauerkraut is composed of four ingredients: cabbage, salt, yeast and time. But, you don't have to add the yeast yourself. It...just...happens!
This is how easy it is:
Ingredients:
5lbs cabbage (more or less)
3 Tbsp kosher or pickling salt (I use kosher because I always have it on hand)
1 Large crock or jar or bucket (sterilized)
Clean, sterile towels
 |
| Cabbage and salt |
You are going to sterilize your container, and finely chop or shred your cabbage.
I've got a great crock here that I borrowed from a friend. This is like the Cadillac of crocks and you are under no obligation to make this investment. However, if you do want one, check out Ebay or Amazon. There are a variety of options, different companies, sizes, colors, etc.
The next step is simply to layer your cabbage with salt. So, layer of cabbage, salt, cabbage, salt, cabbage, until your crock is full. You want the last layer to be salt.
Let this sit at least several hours, but overnight is probably best. The salt is going to work on the cabbage and water will be released, creating a brine. The brine should cover the top of the cabbage when it is weighted down. If it doesn't, you can make some bring using 1tsp of salt per 1cup of boiled water. Make sure it is cooled down, and then add enough brine to cover your cabbage.
 |
| After 1 hour |
 |
| After 2 hours |
 | ||
| Overnight |
As you can see, the cabbage changes drastically, just in a matter of hours. After letting it sit overnight, there was not enough self-generated brine to cover the cabbage, so I made some and covered the cabbage. The next step is to weigh down the cabbage. The crock came with the weights, but if you are using another container, a great method is to put a plate on top of the cabbage and fill a gallon jug or jar with water and place it on top.
Finally, cover the crock. This one comes with a water seal. The deep lid and the lip provide a reservoir for water that creates a natural barrier. If you are using a non-crock method, you will use a damp, sterile towel or pillow case to cover your bucket or container.
Now, all you have to do is leave it alone. You should check it once a week for 3-4 weeks, until the cabbage reaches the level of fermentation you want, and skim off any stuff that grows on top.
I'll be updating everyone on the kraut as time goes one. Stay tuned!
Monday, January 26, 2015
Moburt's = Magic
I want to talk about one of my favorite places in town, a resource I'm going to be using on a regular basis as I explore all kinds of local foods. Moburt's

This is a great place, here in Topeka, and here's a little bit about it.
It's run by great people, born out of a love of cooking and experimenting in the kitchen. Moburt's is a shop that specializes in spices, herbs, salts and sugars. They've recently added balsamic vinegars and olive oils. Let me tell you, when you go there, you are in for a treat!
On my first visit, I was looking for something to top a scone and wouldn't you know it, I found it! Blueberry sugar. That's right, blueberry sugar. Largish crystals of sweet goodness, infused with that purpley, berry magic. What could be a better topping for a....you guessed it....blueberry scone. It was magical and I never looked back. I started exploring other sugars-- espresso (amazing on chocolate chocolate chip cookies) and ginger sugar.

It wasn't long before I was sucked into the salts. Anyone who knows me, knows that the ghost pepper sea salt is my favorite. Indeed, I adore spicy foods. This salt became particularly special in my world when I added it to my chocolate chip cookie recipe (which, by the way, is the World's Best--in my opinion). The sweetness of the cookie dough and chocolate chips, heightened with the sea salt comes first, and then POW! The spicy pepper kicks in at the back of your throat, and then it's gone, leaving only a barely lingering reminder of its heat.

Anyway, there is more to come about my friends at Moburt's. They are going to be one of my most valuable resources in the coming weeks and months.
This is a great place, here in Topeka, and here's a little bit about it.
It's run by great people, born out of a love of cooking and experimenting in the kitchen. Moburt's is a shop that specializes in spices, herbs, salts and sugars. They've recently added balsamic vinegars and olive oils. Let me tell you, when you go there, you are in for a treat!
On my first visit, I was looking for something to top a scone and wouldn't you know it, I found it! Blueberry sugar. That's right, blueberry sugar. Largish crystals of sweet goodness, infused with that purpley, berry magic. What could be a better topping for a....you guessed it....blueberry scone. It was magical and I never looked back. I started exploring other sugars-- espresso (amazing on chocolate chocolate chip cookies) and ginger sugar.
It wasn't long before I was sucked into the salts. Anyone who knows me, knows that the ghost pepper sea salt is my favorite. Indeed, I adore spicy foods. This salt became particularly special in my world when I added it to my chocolate chip cookie recipe (which, by the way, is the World's Best--in my opinion). The sweetness of the cookie dough and chocolate chips, heightened with the sea salt comes first, and then POW! The spicy pepper kicks in at the back of your throat, and then it's gone, leaving only a barely lingering reminder of its heat.
Anyway, there is more to come about my friends at Moburt's. They are going to be one of my most valuable resources in the coming weeks and months.
Tuesday, January 20, 2015
What is love?
I freely admit I have been a bad blogger. It's been almost two years since I posted, and there has been a lot of Pure Food Love in my life since then. I've changed a lot, I've grown a lot. My world has expanded, I've experience the loss of a loved one and the exhilaration of success. I have learned about the beauty of a tight local community and the strength of a shared vision of renewal.
I am going to embark on a quest to explore, discover, and bring to light all of the amazing foods that are locally grown and produced in my little corner of the world. I want to push my understanding of what it means to eat local, to establish relationships with small restaurants and food suppliers. I want to learn to create works of culinary art with the gorgeous, fresh and wonderful foods I can find in this, the Bread Basket, this glorious farm land.
Join me and let's see what we discover, together. Let's experience this Pure Food Love.
I am going to embark on a quest to explore, discover, and bring to light all of the amazing foods that are locally grown and produced in my little corner of the world. I want to push my understanding of what it means to eat local, to establish relationships with small restaurants and food suppliers. I want to learn to create works of culinary art with the gorgeous, fresh and wonderful foods I can find in this, the Bread Basket, this glorious farm land.
Join me and let's see what we discover, together. Let's experience this Pure Food Love.
Tuesday, July 30, 2013
Cheese Experiment #2: Mascarpone
Most people have heard of mascarpone as an ingredient in tiramisu, or have seen it when browsing the fancy cheese section of the store. It generally comes in a 6oz container and costs enough that you'd think twice before purchasing it. What is it really, though?
Basically, mascarpone is like Italian cream cheese, but oh so much more refined. It is creamy, smooth and cool, perfect for desserts or mixing into a special sauce to add richness. Is it easy to make? Yep.
As with the previous experiment, first step was to gather tools.

Next, gather ingredients:

2 cups heavy cream
1/3 cup dry milk solids
1 lemon, cut in half
Three ingredients, again! Doable? I think so.
First thing's first. I added the cream and milk solids together and whisked them in the pot.

Then came the waiting. The milk needed to come to 180 degrees (sound familiar?) over low heat. This took quite a while, about an hour. Once it reached temperature, I squeezed in one half of the lemon and switched to a metal spoon to mix, then added in the juice from the second half of the lemon.

This was the resulting curd. Not so much a separation as in the previous cheese, but a serious thickening.

Finally, this had to be covered and placed in the refrigerator to cool overnight. What resulted?


It looks, more or less, like yogurt, but tastes divine! It was so creamy, so rich, with just the barest aroma and flavor of fresh lemon that you might not even notice. I wanted to dig in with my spoon, but refrained. What shall I do with it? I'm not sure, but since this product has an extremely limited shelf life, three days or so, I better figure it out fast!
Have a favorite mascarpone recipe? Share it below. I love to hear ideas. :)
Basically, mascarpone is like Italian cream cheese, but oh so much more refined. It is creamy, smooth and cool, perfect for desserts or mixing into a special sauce to add richness. Is it easy to make? Yep.
As with the previous experiment, first step was to gather tools.

Next, gather ingredients:

2 cups heavy cream
1/3 cup dry milk solids
1 lemon, cut in half
Three ingredients, again! Doable? I think so.
First thing's first. I added the cream and milk solids together and whisked them in the pot.

Then came the waiting. The milk needed to come to 180 degrees (sound familiar?) over low heat. This took quite a while, about an hour. Once it reached temperature, I squeezed in one half of the lemon and switched to a metal spoon to mix, then added in the juice from the second half of the lemon.

This was the resulting curd. Not so much a separation as in the previous cheese, but a serious thickening.

Finally, this had to be covered and placed in the refrigerator to cool overnight. What resulted?


It looks, more or less, like yogurt, but tastes divine! It was so creamy, so rich, with just the barest aroma and flavor of fresh lemon that you might not even notice. I wanted to dig in with my spoon, but refrained. What shall I do with it? I'm not sure, but since this product has an extremely limited shelf life, three days or so, I better figure it out fast!
Have a favorite mascarpone recipe? Share it below. I love to hear ideas. :)
Sunday, July 28, 2013
Cheese Experiment #1: Paneer
Here we go, cheese numero uno on my journey into cheese making. I'm stoked!
The first step is to collect all the supplies. For this recipe, I'll need:
Non-reactive pot
Measuring cup
Whisk
Rubber spatula
Thermometer
Cheese Cloth
Strainer
Draining rack
4lb Weight

Next, get all the ingredients. This one is pretty easy.
10 cups 2% milk
5 cups Buttermilk
1/2 tsp Sea Salt
Three ingredient recipe? I think that's doable.
I put the milk in the pot and heated it to 175 or 180 degrees. It took a loooooong because you have to heat the milk slowly.

Next, I added the buttermilk and the coagulation was fairly instantaneous. I then raised the heat to 195 degrees. Here's what the curd looked like.

After the curd had cooked and set a little, there was a large collection of fairly firm curds in the pot.

Next, the curd is drained in cheesecloth, salted, and pressed.


Final product:

Not the prettiest paneer ever. I think perhaps the curds were too cool when I pressed them, so they didn't make a block, but holy cow is it delicious!!!
The first step is to collect all the supplies. For this recipe, I'll need:
Non-reactive pot
Measuring cup
Whisk
Rubber spatula
Thermometer
Cheese Cloth
Strainer
Draining rack
4lb Weight

Next, get all the ingredients. This one is pretty easy.
10 cups 2% milk
5 cups Buttermilk
1/2 tsp Sea Salt
Three ingredient recipe? I think that's doable.
I put the milk in the pot and heated it to 175 or 180 degrees. It took a loooooong because you have to heat the milk slowly.


After the curd had cooked and set a little, there was a large collection of fairly firm curds in the pot.

Next, the curd is drained in cheesecloth, salted, and pressed.


Final product:

Not the prettiest paneer ever. I think perhaps the curds were too cool when I pressed them, so they didn't make a block, but holy cow is it delicious!!!
Saturday, July 27, 2013
Cheese Making
One of my goals for several years has been to learn to make my favorite food....CHEESE!
There are so many different kinds: fresh, aged, hard, soft, semi-soft, blue, mild, stinky. Each has its own personality, its own character. So far, I love them all!
So, I'll be starting with some simple cheeses in the coming days and hopefully progressing to more complicated and time consuming cheeses as time goes on.
What's your favorite? Comment below and I might just choose to make your favorite as part of my learning process. :)
There are so many different kinds: fresh, aged, hard, soft, semi-soft, blue, mild, stinky. Each has its own personality, its own character. So far, I love them all!
So, I'll be starting with some simple cheeses in the coming days and hopefully progressing to more complicated and time consuming cheeses as time goes on.
What's your favorite? Comment below and I might just choose to make your favorite as part of my learning process. :)
Sunday, June 9, 2013
Eeeek!
Worst blogger ever!!!
So I set up my contest and then forgot to draw for the New York prize!!! Well, I'm afraid it is going to have to wait a little while longer.... I can't find it! I put it some place safe while I've been working on clearing out the second bedroom and reorganizing and now I'm not sure where it went. :(
My apologies to my readers. I'll stop being such a putz and get back on it!
So I set up my contest and then forgot to draw for the New York prize!!! Well, I'm afraid it is going to have to wait a little while longer.... I can't find it! I put it some place safe while I've been working on clearing out the second bedroom and reorganizing and now I'm not sure where it went. :(
My apologies to my readers. I'll stop being such a putz and get back on it!
Monday, May 13, 2013
Overload and Institutions
So, I am back in Kansas, and it has taken me a week to get back on track with the restaurant. It's graduation season and that means lots of extra parties and caterings. I want everyone to know that there is much more New York to come, though. Keep reading and new stories will be showing up. :)
In the mean time, let's talk about Mother's Day. I've been a horrible person. This past year, my grandmother went to live in a skilled care facility, basically a nursing home. While the place is great, the rooms are comfortable, staff friendly, and there is no weird odor, I've been hesitant to visit, and in all honesty, Mother's Day was the first time I'd been there to see her. She, being the kind hearted person that she is, didn't hold it against me. Instead, she was simply thrilled that I came to see her at all. I'll be building more visits into my schedule, and perhaps bringing her food once in a while, which brings me to the focus of my post.
I've heard stories....about the food. I understand this is an institutional setting and I understand that a lot of people there are on restricted diets, but for the life of me I cannot understand why, in such an expensive facility, they cannot afford quality food for the residents. When you are living inside all day, with minimal activities to keep you occupied, you look to your meals for excitement. I feel a new mission coming on, a keen desire to look into how food preparation works in this place. Is the budget that restrictive that they cannot hire skilled individuals in the kitchen to keep my grandmother from eating mush pasta and cardboard pork chops?
Inquiring minds want to know, and find out, I shall.
In the mean time, let's talk about Mother's Day. I've been a horrible person. This past year, my grandmother went to live in a skilled care facility, basically a nursing home. While the place is great, the rooms are comfortable, staff friendly, and there is no weird odor, I've been hesitant to visit, and in all honesty, Mother's Day was the first time I'd been there to see her. She, being the kind hearted person that she is, didn't hold it against me. Instead, she was simply thrilled that I came to see her at all. I'll be building more visits into my schedule, and perhaps bringing her food once in a while, which brings me to the focus of my post.
I've heard stories....about the food. I understand this is an institutional setting and I understand that a lot of people there are on restricted diets, but for the life of me I cannot understand why, in such an expensive facility, they cannot afford quality food for the residents. When you are living inside all day, with minimal activities to keep you occupied, you look to your meals for excitement. I feel a new mission coming on, a keen desire to look into how food preparation works in this place. Is the budget that restrictive that they cannot hire skilled individuals in the kitchen to keep my grandmother from eating mush pasta and cardboard pork chops?
Inquiring minds want to know, and find out, I shall.
Sunday, May 5, 2013
Papabubble
No, I didn't just make up a word. While wondering through Chinatown, heading toward Little Italy, my friend and I stumbled upon a strange store front.

In the window were all kinds of interesting cactus looking things.


These are made out of.... sugar! Papabubble is a small handmade candy store that originated in Spain and now has several locations around the globe. They had some crazy flavors including salted licorice, mango and chili, and fun candies with various words and shapes in the center, like a burrough mix, an alphabet mix and a math mix.
Here's what their work space looked like:

The beakers contain flavors for the different candies and the tools and counter tops are all shiny stainless steel. Worth a visit and a taste. You can watch them work if you are there when they are making candy.

In the window were all kinds of interesting cactus looking things.


These are made out of.... sugar! Papabubble is a small handmade candy store that originated in Spain and now has several locations around the globe. They had some crazy flavors including salted licorice, mango and chili, and fun candies with various words and shapes in the center, like a burrough mix, an alphabet mix and a math mix.
Here's what their work space looked like:

The beakers contain flavors for the different candies and the tools and counter tops are all shiny stainless steel. Worth a visit and a taste. You can watch them work if you are there when they are making candy.
Friday, May 3, 2013
Chinatown
I couldn't wait to get to Chinatown. I was so excited to see what it was like, experience China in another country. Now I've been there twice. Once on my birthday, quick walk through, visit to a temple which I posted about earlier, and again on Wednesday. Both times, I as struck by the fact that it looked and sounded and smelled exactly like China!
It's Chinatown, you say, of course it is like China. No, I mean I might as well have been on the street in Beijing. The banks were Chinese, the newspapers were Chinese, the seafood restaurants had live fish that you selected for your meal. There were roasted ducks in the windows.


And, not to miss out, we went to Nom Wah Tea Parlor, which bills itself as the oldest Dim Sum restaurant in New York City.

If only there were more hours in the day, I would have gone back every day this week. It was delicious, real Chinese awesomeness. There is not much better than having the opportunity to try so many things. The way dim sum works is that you order a number of small plates. Think Chinese tapas. There are only a few of each things on the plate, so you get to work your way through five or six different items, savoring each one as you go.
After all of this and a pot of jasmine tea, we rolled ourselves out to the street and made our way home.
It's Chinatown, you say, of course it is like China. No, I mean I might as well have been on the street in Beijing. The banks were Chinese, the newspapers were Chinese, the seafood restaurants had live fish that you selected for your meal. There were roasted ducks in the windows.


And, not to miss out, we went to Nom Wah Tea Parlor, which bills itself as the oldest Dim Sum restaurant in New York City.

If only there were more hours in the day, I would have gone back every day this week. It was delicious, real Chinese awesomeness. There is not much better than having the opportunity to try so many things. The way dim sum works is that you order a number of small plates. Think Chinese tapas. There are only a few of each things on the plate, so you get to work your way through five or six different items, savoring each one as you go.
 | |
| Delicious Pork Fried Dumplings |
 | |
| Fried Scallion Pancake with Soy Sauce |
 | |
| Steamed Shrimp and Pea Pod Dumplings |
 |
| Pork Short Ribs in a salty spicy sauce |
 |
| Shanghai Soup Dumplings |
 |
| House Special Steamed Pork Bun |
 |
| Inside of said bun--pork and onion goodness |
After all of this and a pot of jasmine tea, we rolled ourselves out to the street and made our way home.
Subscribe to:
Posts (Atom)